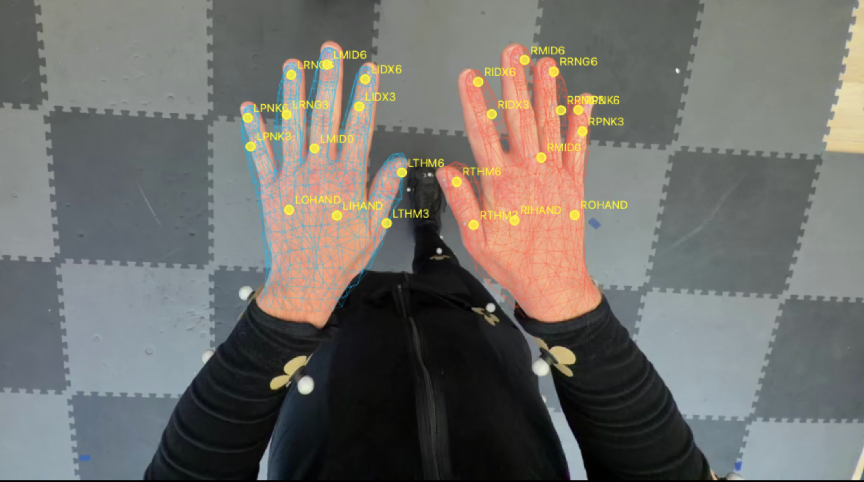
At Trace, we capture data of humans doing real-world tasks to help train the next generation of robotics AI models. One type of data that makes up a bulk of the training set is egocentric (first-person) videos of tasks being performed. A sample of egocentric data generally consists of a video along with metadata such as the operator’s hand positions, or the camera’s position, in 3D space. In our case, this metadata is derived from a post-processing pipeline using hand tracking and SLAM algorithms. High-quality training data needs this metadata to be very accurate, and to get accurate results out of these algorithms we need to be careful about what we feed them. One variable we pay attention to is motion blur, which has a significant effect on the quality of hand tracking and SLAM. In this post we’ll talk about how we reduced motion blur in our data (while balancing against other quality concerns) by writing our own auto-exposure loop.
A key data stream we capture is egocentric RGB video data, from head-mounted iPhones. We use the ultrawide camera to ensure the widest possible field-of-view, so that the operator’s task and hand movements are fully visible throughout the capture. This data is combined with IMU measurements and depth data in post-processing to derive the camera’s trajectory through space using SLAM, and the position of the operator’s hands in this space using our own sophisticated hand tracking model. The accuracy of this derived spatial data is extremely important, and this accuracy is highly correlated with qualities of the captured video. One thing that will absolutely tank the quality of SLAM and hand tracking is motion blur.
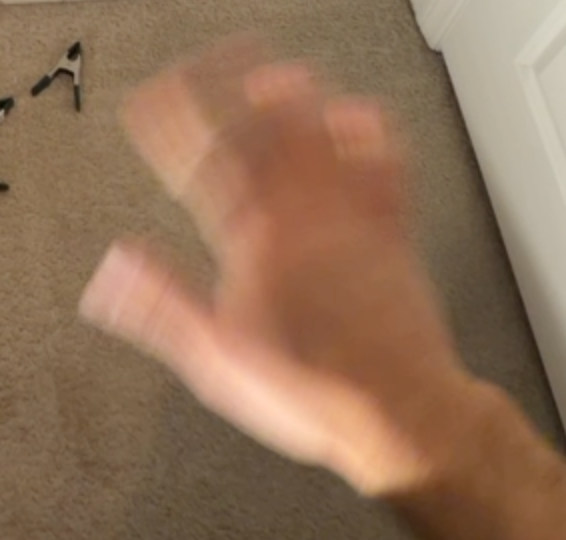
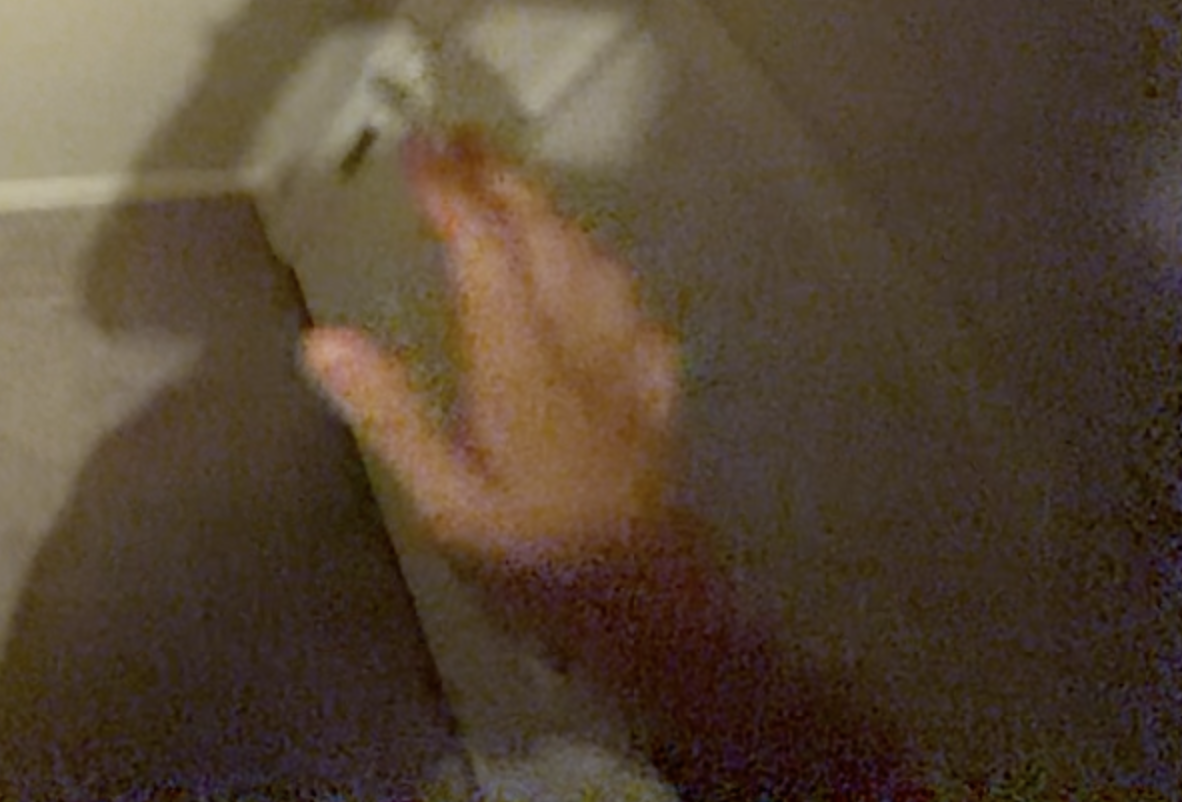
You’ve seen motion blur before in pictures and videos. It happens when an object being photographed is moving too fast for the camera being used. It conveys a sense of speed and motion, which is great aesthetically. Unfortunately, it makes that same object hard for a computer vision algorithm to understand. SLAM works by identifying features in a video and tracking their location through subsequent frames. If a feature is blurred in some frames, the SLAM algorithm will fail to match it with it’s unblurred appearance. Hand tracking works by identifying shapes that look like hands, and finding individual features like fingers. Good luck figuring out exactly where the fingers are on this blurred hand:
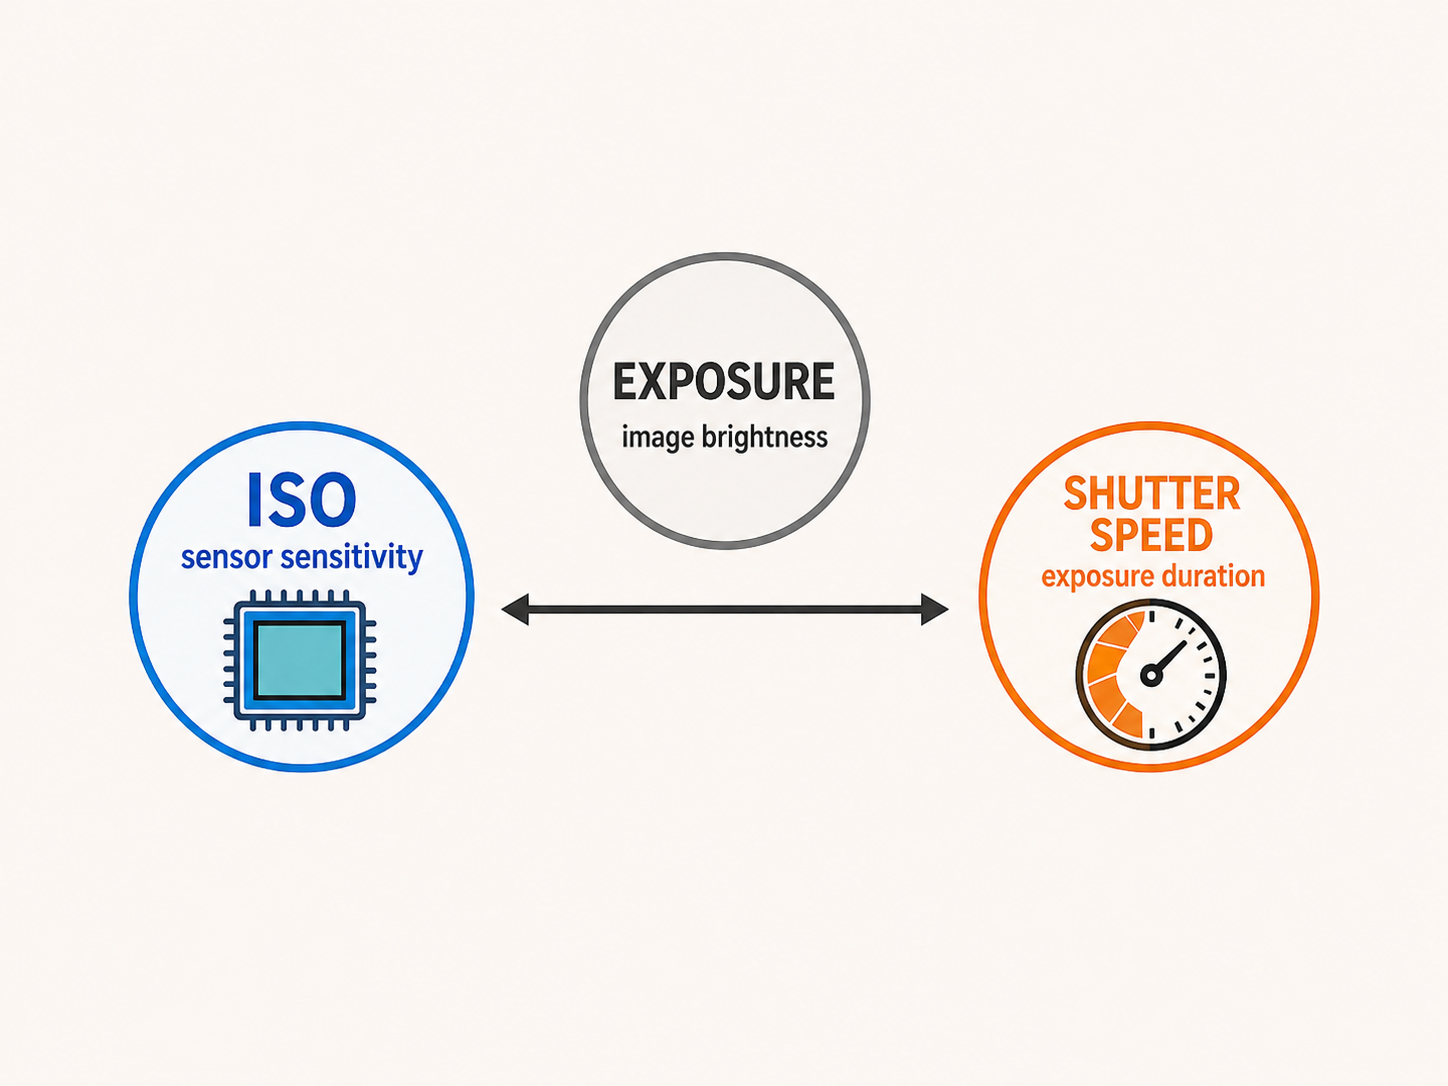
To understand motion blur, we need to understand how a camera takes a picture in the first place. Phone cameras have a digital sensor that collects photons (light particles bouncing off objects in the world before ending at the sensor). These photons are directed into the sensor by a lens, and a shutter opens and closes to control how long photons are collected. Each of these components can be controlled by a single parameter:
These parameters can be arranged in the classic “exposure triangle”:
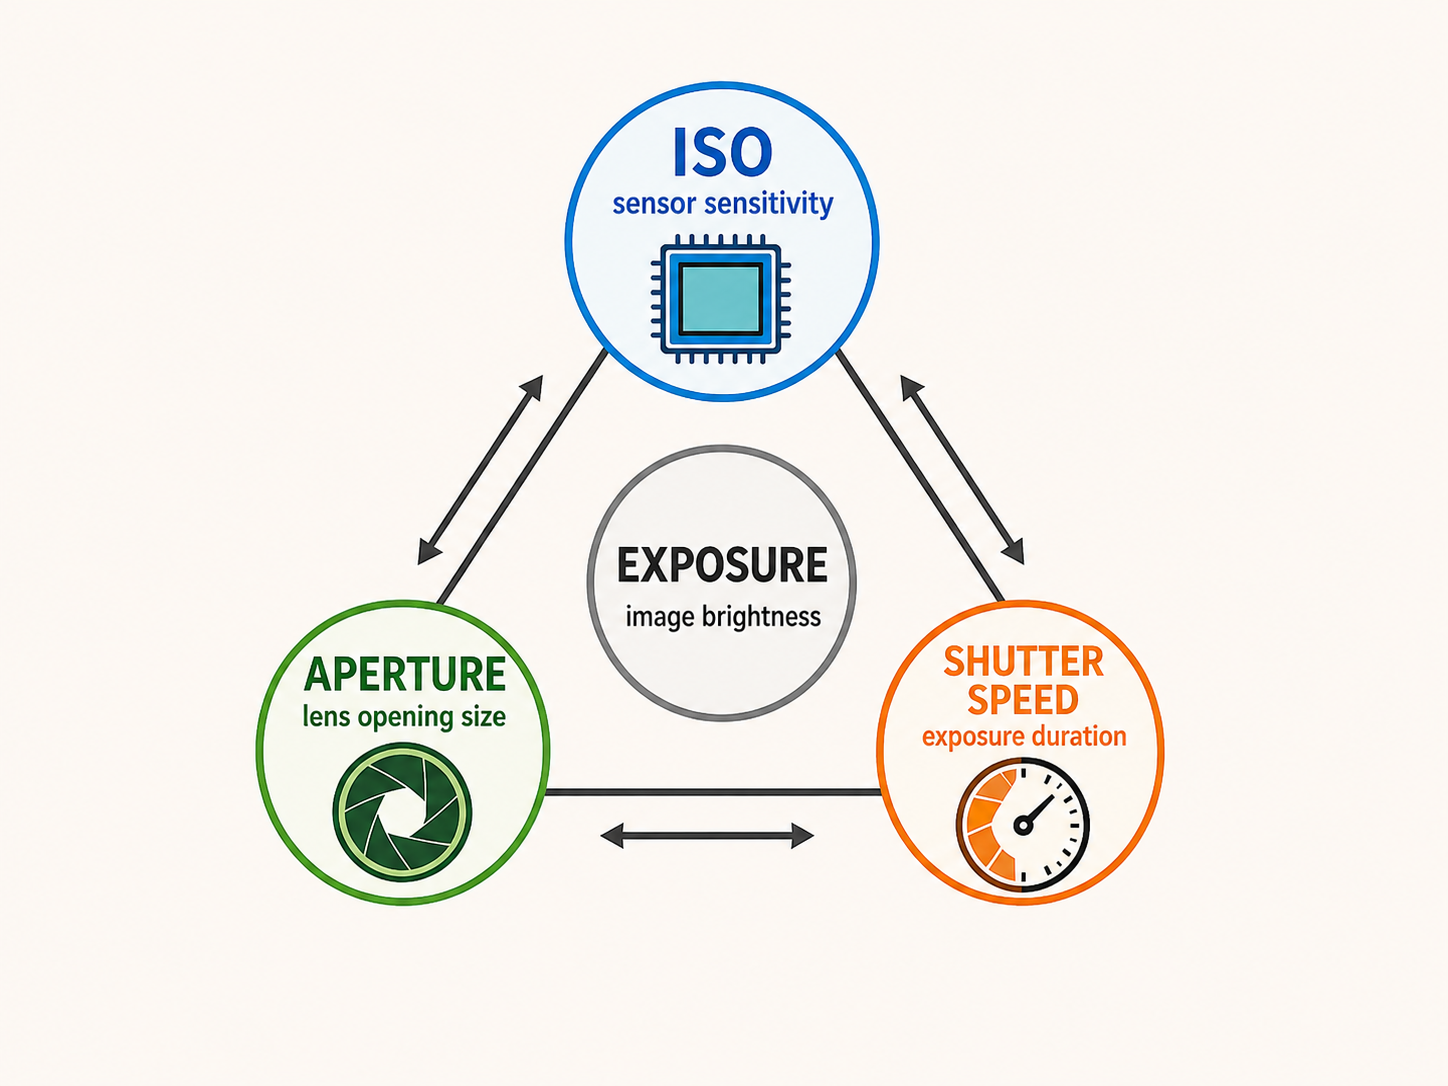
Varying these parameters allows changing how light is collected to take a photo. If you want to maintain constant brightness, a change in one parameter requires a corresponding change in another. If you want a faster shutter, you need to increase ISO or aperture to maintain the same brightness.
Why would you want a faster shutter? Because that’s how you fix motion blur! Motion blur happens when the object being photographed moves across the frame while the shutter is open. The more the object moves in that time period, the more motion blur there is. Holding the shutter open for longer lowers the speed necessary to produce motion blur. Conversely, the shorter the exposure time, the faster the object can move without producing motion blur. Thus we can solve our problem of blurry hands by simply increasing the shutter speed of the iPhone camera. One prompt of “computah, increase the shutter speed” and AI can one-shot this, right?
If only it were that easy!
We know that we can increase shutter speed to reduce motion blur in the videos we record. How can we do this on an iPhone?
The iPhone exposes a rich API for controlling the camera called AVFoundation. This API contains the class AVCaptureDevice which represents a physical camera, such as the ultrawide camera that we use in our iPhone app. An AVCaptureDevice instance has an ExposureMode, which controls the exposure parameters we defined earlier. On an iPhone, the aperture has a fixed size, so the exposure triangle above collapses into an exposure line:
Thus the parameters that the ExposureMode controls are the shutter speed and the ISO. There are 4 types of possible ExposureModes:
locked: the exposure parameters are locked at the current settings and do not change during the video recordingautoExpose: the iPhone software determines the exposure parameters based on the current scene, then locks at those parameters for the duration of the recordingcontinuousAutoExpose: the iPhone software continually reads the brightness of the scene and adjusts shutter speed and ISO automaticallycustom: you control the exposure parameters yourself. Full control, but also full responsibility for creating an adequately-lit frameBy default, the iPhone camera uses continuousAutoExpose and takes care of controlling exposure for you. Under the hood, the iPhone is metering the brightness of the scene, taking into account exposure targets (points of interest to optimize exposure for), and actively changing exposure parameters to produce an optimally-lit frame based on its models. You have some ways to influence the behavior of this process - for example, you can tell the control process how bright or dark you want the resulting frame, or specify exposure targets. But the only real control you have over the shutter speed (in this mode) is by setting the activeMaxExposureDuration. Since this is an upper bound on the exposure duration, it’s a lower bound on shutter speed (faster shutter → lower exposure duration).
Sounds like we’re done, right? We want a faster shutter, so we can have less motion blur. This seems easily achievable by setting an activeMaxExposureDuration that corresponds to our desired shutter speed. For example, if we want the shutter to only open for 1/90th of a second, we can set activeMaxExposureDuration to 0.1111 seconds. We do this, the shutter is faster, and continuousAutoExpose takes care of controlling the ISO to ensure the image is well-lit. This was my initial attempt at solving the problem.
Everyone has a plan until they get punched in the face. In my case, the punch in the face came in the form of different lighting conditions. In darker settings, the faster shutter speed led to obvious visual noise that made the video look worse. I was worried that this noise could degrade our SLAM and hand tracking accuracy. Understanding how to fix this meant understanding image noise.
As with all sensors, a camera’s image sensor picks up signal (good data, in this case light) and noise (bad data). Noise in this case comes from a variety of sources, like the specifics of how the sensor actually turns photons into pixel measurements. One big noise source is shot noise - when you collect photons, the random variance inherent in their flow means you will always collect a slightly different number of them even if you always collect them for the same fixed time period. Imagine putting a bucket in the rain - even if it’s raining at a steady pace, one second you might get 98 drops and another second you might get 101 since they are falling randomly. The light is the rain, the photons are the raindrops, and the pixels are each a bucket.
Noise of this type scales with the square root of the number of photons collected (under the assumption that their arrival to the sensor has a Poisson distribution). This means the signal-to-noise ratio is N/√N, where N is the number of photons collected while the shutter is open. Thus the more photons we collect, the higher our signal-to-noise ratio — in other words, the more light that is available to the exposure, the less noise we will observe in the resulting frame.
Aperture and shutter speed are the two variables in the exposure triangle that control how much light is let into the sensor during the exposure. The remaining variable, ISO, doesn’t control how much light is let in, but instead controls how much the resulting sensor measurements are amplified. A higher ISO amplifies the noise in the image, making it more visually obvious. Since we cannot control aperture, shutter speed is the only variable we have for controlling the amount of light captured for the frame. And when we increase shutter speed, we need to raise ISO accordingly to keep the frame adequately lit, which makes noise more visible.
The conclusion is that there is a tradeoff between shutter speed, and visual noise. The higher the shutter speed, the more noise we will see in the resulting image. So we want to find a good middle-ground between shutter speed (i.e. less motion blur), and perceived visual noise.
The problem with the approach we outlined above is that it does not give us much actual control over the shutter speed chosen by the iPhone’s continuous auto-exposure mode. We can merely set a lower bound for shutter speed. We want to pick a specific shutter speed that balances reducing motion blur and visual noise, but we cannot set a specific shutter speed in this approach.
In tests, we tried setting the minimum exposure time to 1/40s, 1/60s, 1/90s, and 1/120s, using the activeMaxExposureDuration setting described earlier. In practice, the phone camera used 1/60s exposure time for the first two settings, and 1/120s for the latter two. This is consistent with the fact that we were simply setting a lower bound and letting the auto-exposure algorithm pick the actual shutter speed.
A possible good middle-ground between 1/60s (slower) and 1/120s (faster) would be 1/90s, but in this current approach we can’t make the camera use a 1/90s exposure time. The auto-exposure algorithm would rather choose 1/120s, requiring a higher ISO than 1/90s would need in order to maintain acceptable brightness. But this need for a higher ISO means that there is more visual noise as well.

In order to explore this middle-ground, we need to give up the auto-exposure algorithm and manage exposure ourselves, via ExposureMode.custom. The API method for initiating this exposure mode makes our responsibility clear — we need to manually set both exposure duration and ISO:
func setExposureModeCustom(
    duration: CMTime,
    iso ISO: Float
) async -> CMTime
Via this method we can specify an exact shutter speed, but we must specify ISO as well. How do we decide what value to set ISO at?
Ultimately our goal when choosing an ISO value is to make sure the resulting image is not too bright and not too dark. AVFoundation’s auto-exposure algorithm works by determining if the current exposure settings make the frame too dark or too bright, and adjusting accordingly. Metering is the process of determining how bright the frame is. Back in the day, when photographers shot on film they had to develop later in a darkroom, they used a handheld light meter to determine how bright the scene was, so they could adjust their exposure settings accordingly. Now, the camera itself can do the metering, based on a combination of factors. So for our custom exposure algorithm, we will need to do some metering.
Luckily even though we’ve given up on using AVFoundation’s auto-exposure algorithm, we can still use its built-in metering functionality. AVFoundation has an “exposure target”, and when a frame’s “exposure level” meets this target, AVFoundation thinks the frame is optimally bright. The AVCaptureDevice class has a method exposureTargetOffset which tells you how far off the current scene’s exposure level is from that target. This offset is in exposure value units, on a logarithmic scale where a difference of 1 EV corresponds to either a doubling or a halving of the requested exposure. Recall that exposure is a function of our 3 exposure parameters. Since in our case, shutter speed and aperture are fixed, that means a difference of 1 EV corresponds to a doubling or halving of ISO.
From this we can derive a very simple control loop for ISO, given the exposure target offset. When there is a positive offset (frame is too bright), lower the ISO. When there is a negative offset (frame is too dark), raise the ISO. How much do we lower or raise the ISO? Well, since a offset of +1 EV means we need to halve the ISO, that means the new value should be new_iso = current_iso * 2^(-offset). Thus the simple control loop is just:
every tick of the loop:
  offset = device.exposureTargetOffset
  new_iso = current_iso * 2^(-offset)
  device.setExposureModeCustom(duration=1/90, iso=new_iso)
  current_iso = new_iso
This should be enough, right?
If you’ve ever encountered control theory before, you could probably tell that the simple loop presented above has some issues. Two big ones:
new_iso which is simply invalid. The device API for setting ISO will not respect it, or fail outright. Every camera has ISO limits, and we may want to set our own limits as well. So we need to tell our loop to stick within a min and max ISO.These are pretty simple to fix in our loop. When the offset is sufficiently small, we wont change it anymore, fixing the hunting (this is called defining a deadband). And we will clamp the ISO the algorithm spits out:
every tick of the loop:
  offset = device.exposureTargetOffset
  if abs(offset) <= DEADBAND_THRESHOLD:
    return

  new_iso = current_iso * 2^(-offset)
  new_iso = clamp(new_iso, MIN_ISO, MAX_ISO)

  device.setExposureModeCustom(duration=1/90, iso=new_iso)
  current_iso = new_iso
Now the loop can converge more easily, and it will never produce an ISO value that’s impossible to use. However, there is another issue with our system - it’s too aggressive. Currently we attempt to correct the ISO in a single tick of the loop. However the ISO correction is a reaction to the metering, and by the time the exposure offset has been determined, the actual lighting of the scene may have changed, so the ISO change is no longer correct. Since we are taking big steps, if we are wrong it will be in a big way. This leads to the following problems:
We can address these by damping our response to the offset, and limiting the speed at which ISO can change:
every tick of the loop:
  offset = device.exposureTargetOffset
  if abs(offset) <= DEADBAND_THRESHOLD:
    return

  new_iso = current_iso * 2^(-offset * DAMPING_COEFF)

  # only allow ISO to change by up to some % of the current ISO
  new_iso = clamp(new_iso,
                  current_iso * (1 - MAX_STEP_PCT),
                  current_iso * (1 + MAX_STEP_PCT))

  new_iso = clamp(new_iso, MIN_ISO, MAX_ISO)

  device.setExposureModeCustom(duration=1/90, iso=new_iso)
  current_iso = new_iso
This version of the loop transitions between exposure settings more smoothly, leading to less perceptible brightness ramping.
At this point we have a simple but stable loop for setting ISO, and we can happily capture video at a constant exposure duration of 1/90s as the camera moves between scenes with different brightness levels.
Now that we have a way to control the shutter speed more precisely, we can test our hypothesis that using a middle-ground of 1/90s exposure time would lead to less noise than we saw with 1/120s exposures. Since higher ISO is associated with more noise, let’s also look at the effect of capping the max ISO to 1500, far below the device maximum of 2300.
Graphs below are derived from making recordings of a static scene from a tripod, for 5 different exposure profiles, in both light and dim conditions. For each exposure profile and lighting condition, we recorded 5 clips, each 5 seconds long. The exposure profiles are:
First let’s look at the median ISO:
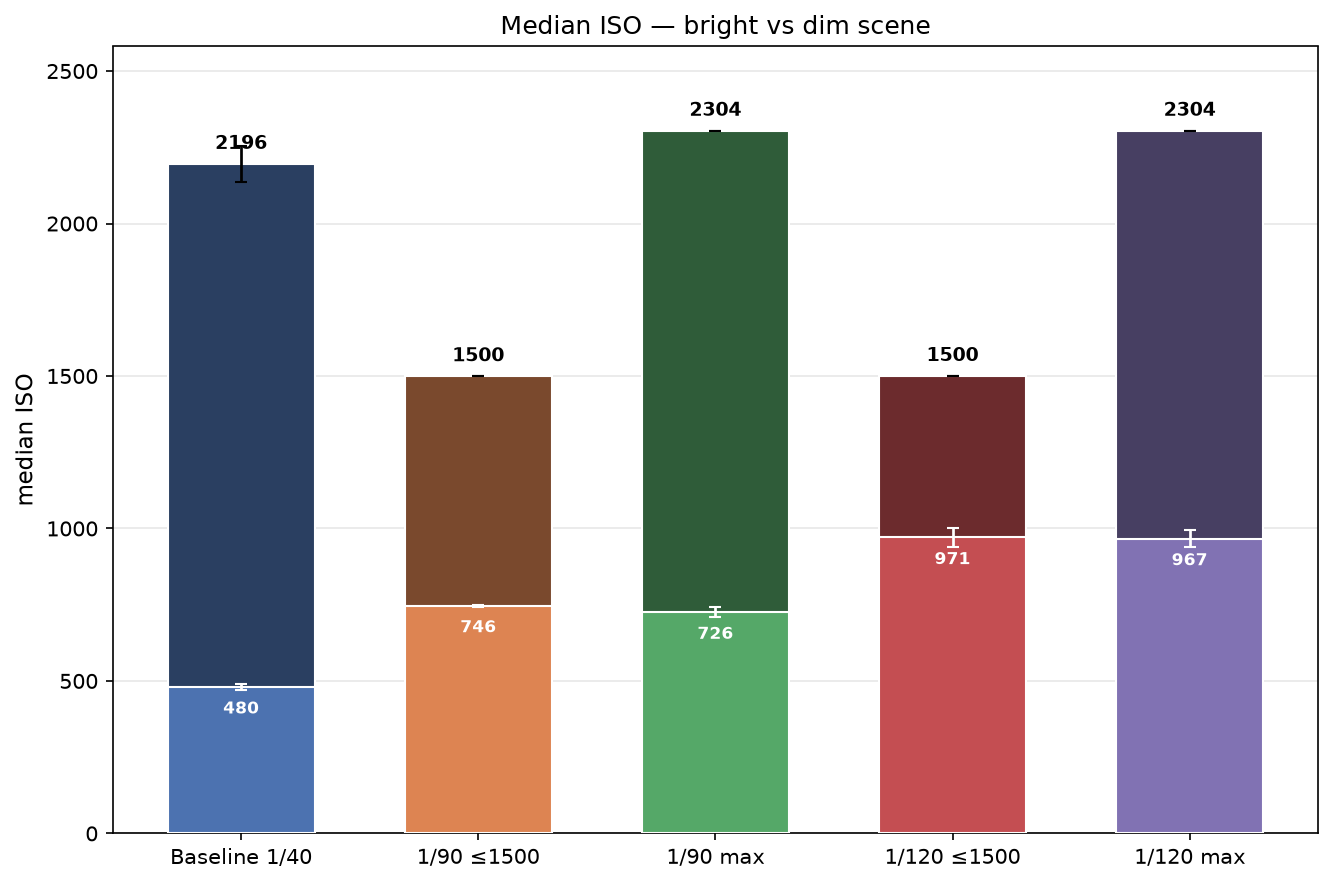
The dark bars represent the medians across the dim scene, and the light bars represent the medians across the bright scene. In bright conditions, we see the ISO predictably increase as shutter speed increases. In dim conditions, ISO hits the cap at both 1/90s and 1/120s, as it was already close to the cap at baseline.
Hitting the ISO cap means the dim sessions are darker than baseline. They need higher ISO than the device supports in order to match the baseline brightness. This is apparent in the next graph:
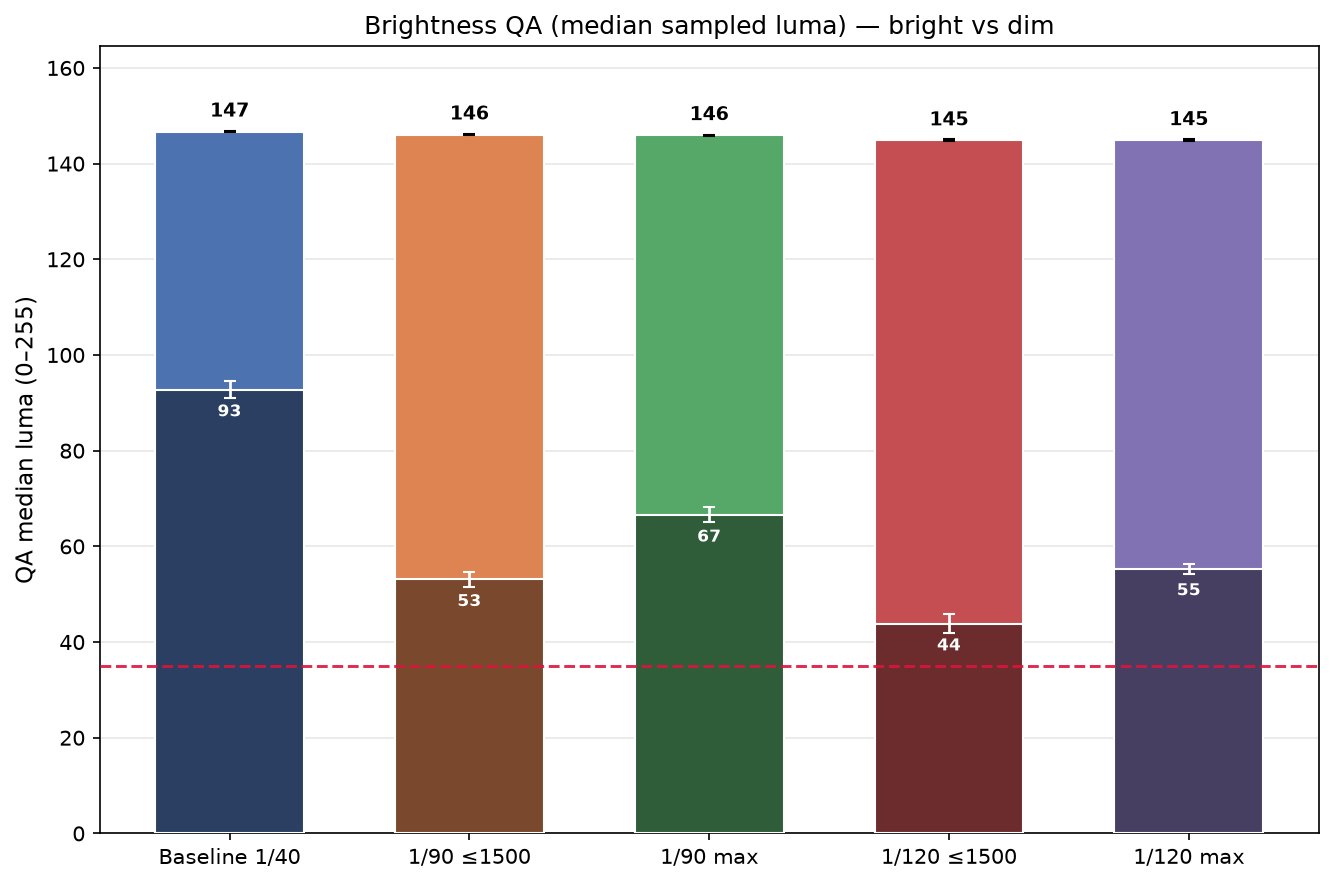
We see the bright sessions are all equally bright, even with different ISOs. This makes sense given how we adjust ISO based on a brightness meter. For the dim sessions however, the brightness is lower than baseline. If we cap the ISO, then for a given shutter speed, the brightness will be lower than if we left it uncapped.
This loss of brightness compared to baseline in dim lighting is bad, because part of our QA process rejects footage that is too dark to reliably run SLAM and hand tracking on. This QA floor is shown by the dotted red line in the graph. As we can see, the exposure changes push a dim session that was well above the threshold (93, QA threshold is 35) quite close to failing in some cases. This is another reason why we can’t just jack the shutter speed as high as possible. So when evaluating our final choice for a capture profile, we need to weigh decreasing noise against making sessions fail QA at a higher rate.
Speaking of noise, here is our first attempt at quantifying it:
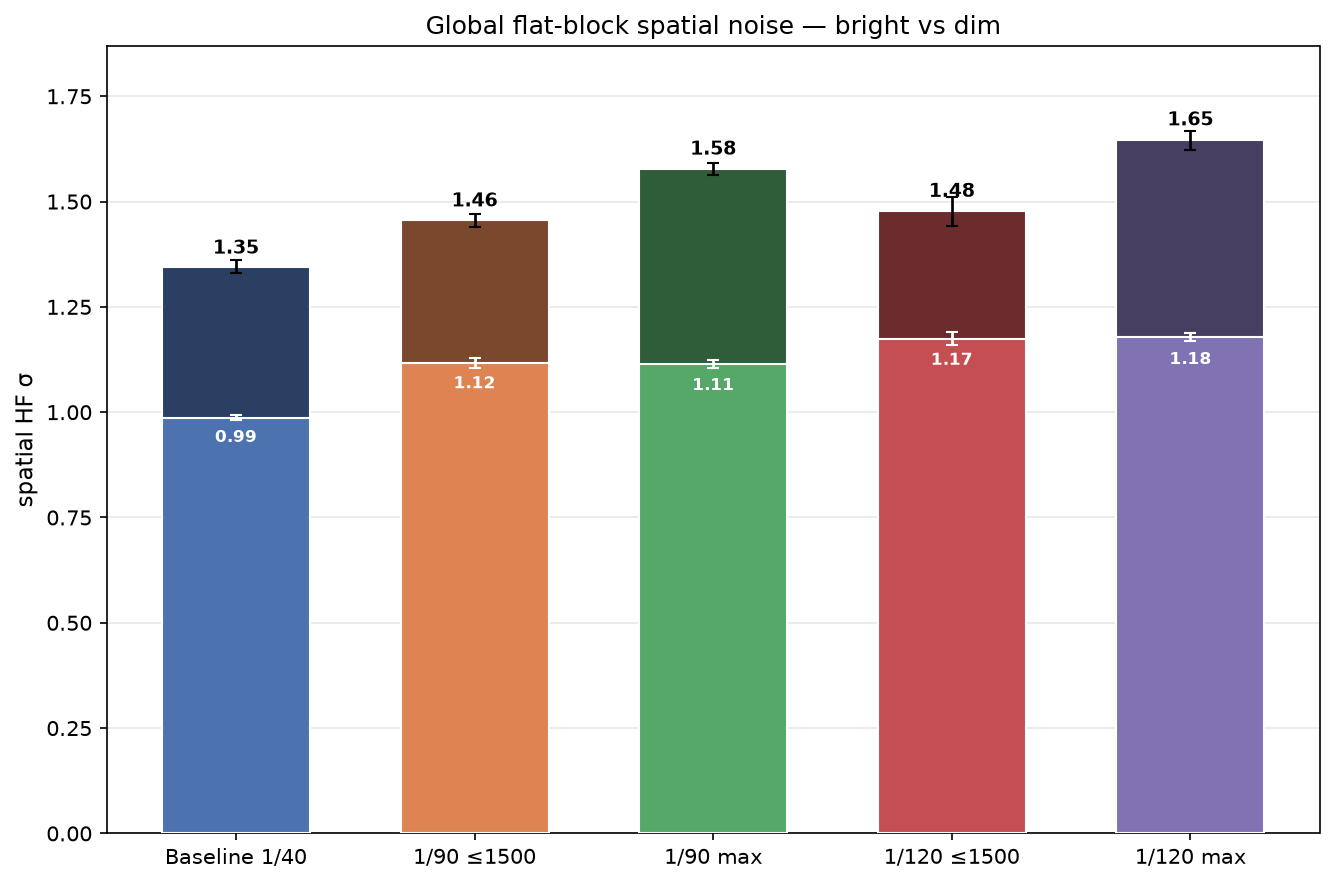
The measure of noise we use here is flat-block spatial noise, measured across a frame and averaged across the videos. Flat-block spatial noise is an approach which quantifies how grainy the image is. We find sections of flat color and measure how much the pixels vary in color over its extent. This grain can mess with feature detection in SLAM.
As we see in the graph, the brighter sessions are all less noisy than the dim sessions, like we would expect. For the bright sessions, the noise increases with shutter speed but is independent of the ISO cap, because the ISO doesn’t hit the cap. For dim sessions however, we see the noise increases when dropping the cap for the same shutter speed.
A better measure of noise for quantifying the effect on SLAM and hand tracking is temporal noise. Temporal noise asks a question: in a video of a static scene, how much does the color of any given pixel flicker? In theory it shouldn’t change at all, but it does when there is temporal noise. This type of noise induces a false sense of movement which can mess with SLAM feature detection and tracking.
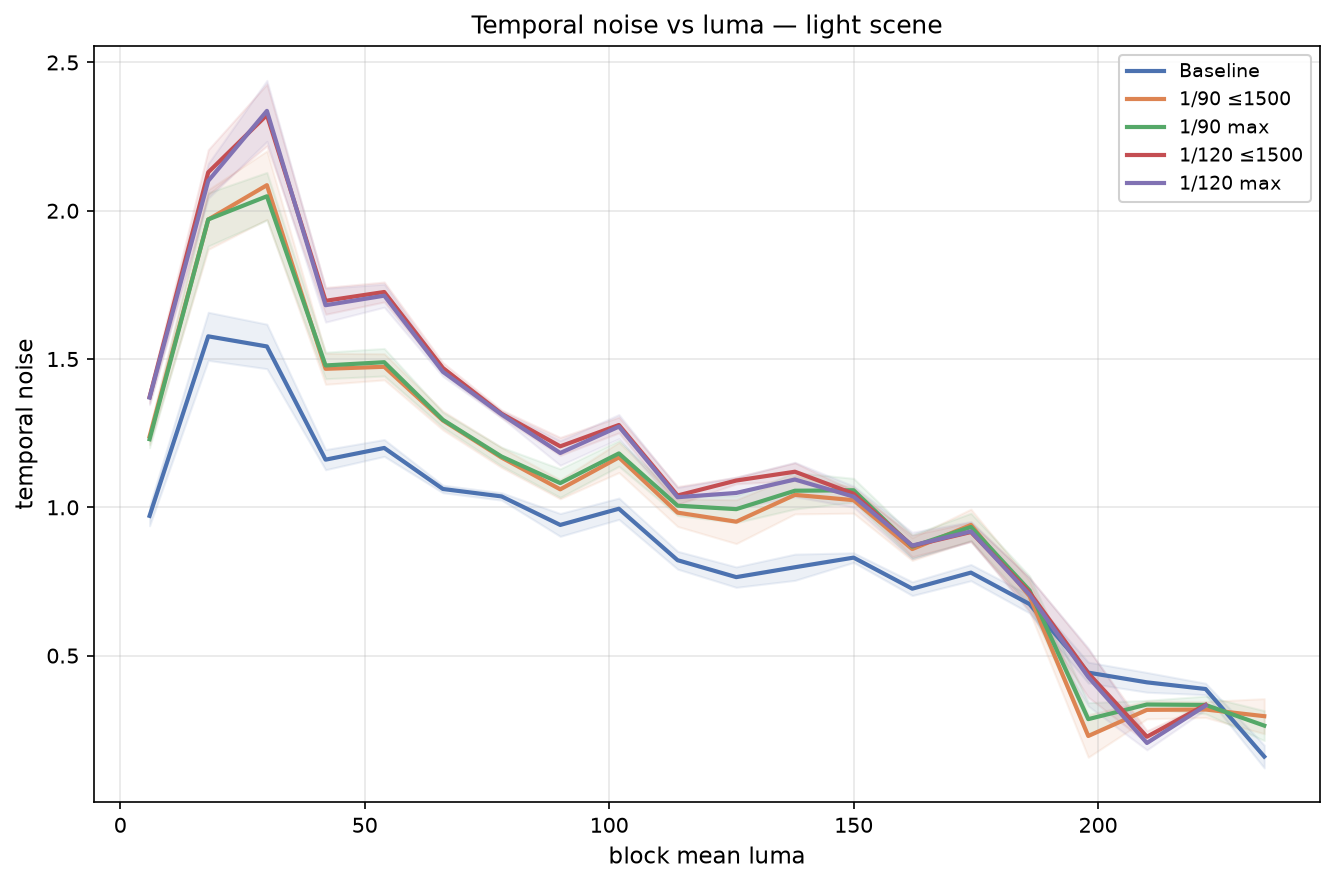
We took our test videos, cut them up into 16x16 pixel blocks, measured the temporal noise for each block and binned them by their average brightness. The graph above plots the mean temporal noise for these bins compared to their brightness, for the bright sessions.
As we can see, temporal noise occurs most in darker regions of the video frames, and for most luma values there is a clear increase in noise as shutter speed increases. However, when the frame region is sufficiently bright, noise mostly disappears and comparisons between exposure profiles become unclear. The baseline exposure is the least noisy, as it uses the iPhone’s sophisticated auto exposure algorithm. Once again, capping the ISO doesn’t affect noise, as the ISO cap isn’t reached in these bright sessions.
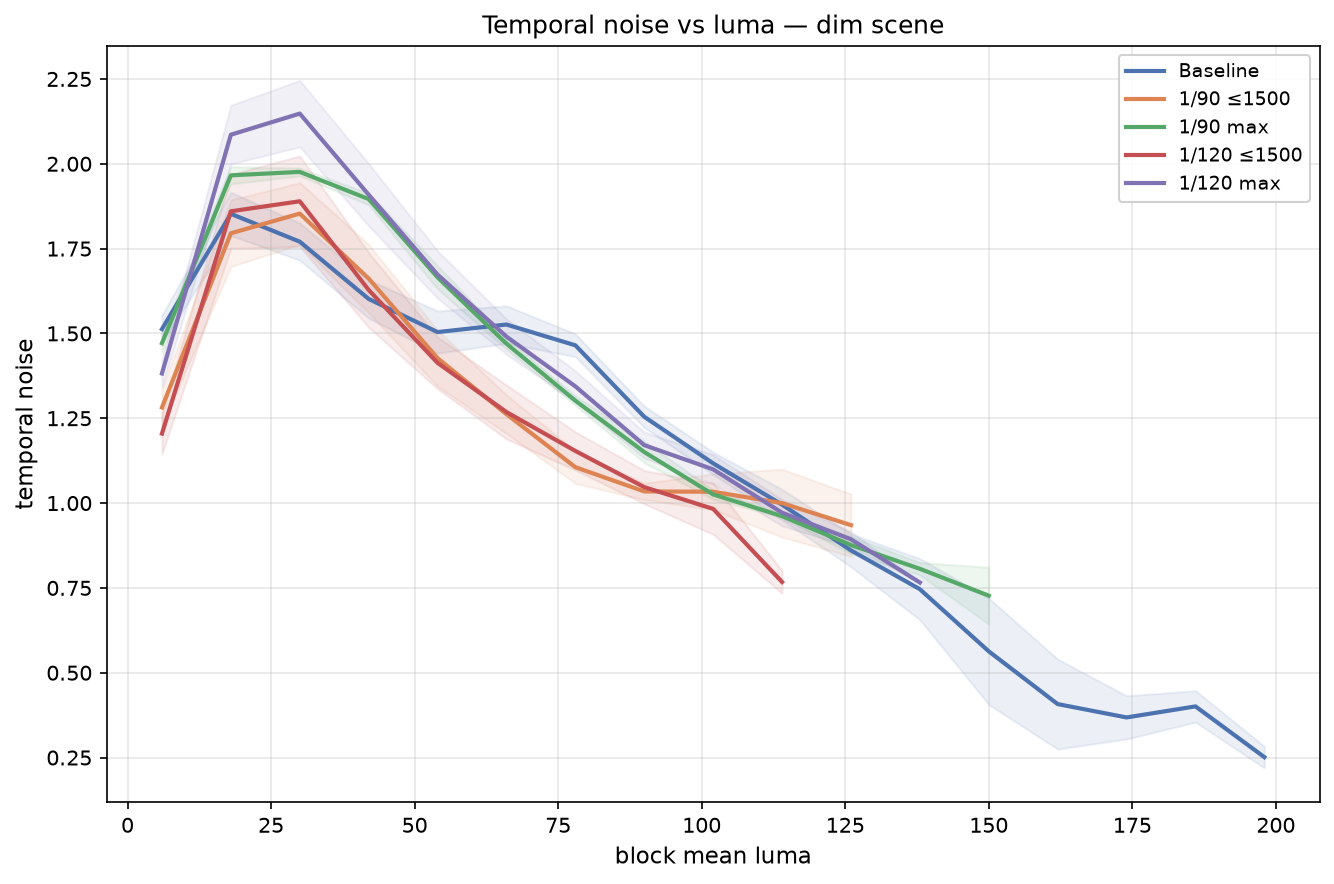
Dim sessions paint a different picture. Notably, capping the ISO in these sessions leads to a decrease in temporal noise, and the noise is roughly equal for capped 1/90 and 1/120 exposures. In this graph, noise appears not to depend on shutter speed for a given block luma, only ISO. As with the light scenes, noise is higher when the block is darker. We also see the fact that capped sessions are dimmer appear in this graph, represented by the length of the lines.
By now we’ve looked at enough graphs to make a decision on what parameters to use in our control loop. As we expected, in most cases there is less noise when we choose a 1/90s exposure instead of the faster 1/120s one. The exceptions come in dimmer scenes, where we hit the ISO cap and see roughly equivalent noise at the different shutter speeds. In these conditions, lowering the max ISO to cap it at 1500 has the biggest effect on decreasing noise.
Based on these experiments we chose to change our iPhone app to record video at a fixed 1/90s exposure duration, capping ISO at 1500 to decrease visible noise in dimmer lighting conditions. There are still tradeoffs, as in all engineering — capping ISO leads to the resulting recording being darker. But this is something that can be mitigated by making sure the scene is adequately lit before recording.
No AI was used when writing this essay, except to help generate a few images and brainstorm titles.